ntfy: Send notifications through libnotify to Linux desktop

I've recently started using ntfy to send notifications to my phone from some scripts I'm running on my home NAS. This works great, but when I'm on my PC, I'd rather get notifications there instead of on the phone. There doesn't seem to be a desktop app for ntfy, but luckily the API is extremely simple. I've also recently started picking up Python, so I decided to whip together a simple ntfy notification delivery system for the Linux desktop. To use this, you need notify-send (provided by the libnotify package), and python3.

ntfy-listener.py:

from sys import argv
import requests
import json
import subprocess

# Sends desktop notifications to a subscribed ntfy topic through libnotify/notify-send
# Usage: python3 ntfy-listener.py topic-name

if len(argv) > 1:
    try:
        resp = requests.get(f"https://ntfy.sh/{argv[1]}/json", stream=True)
        for line in resp.iter_lines():
            if line:
                ntfyData = json.loads(line)
                if ntfyData["event"] == "message":
                    ntfyTitle = "ntfy"
                    if "title" in ntfyData:
                        ntfyTitle = ntfyData["title"]
                    subprocess.run(["notify-send", "-u", "normal", ntfyTitle, ntfyData["message"]])
    except KeyboardInterrupt:
        exit()
    except Exception as e:
        print(e)

Launch the script with python3 ntfy-listener.py ntfy-topic-name , where ntfy-topic-name is the ntfy topic you'd like to subscribe to, and any incoming notifications will be delivered though your DE's notification system! I've additionally added it to KDE's autostart, so it loads in the background when I log in:

~/.config/autostart/ntfy-listener.desktop:

[Desktop Entry]
Exec=python3 /opt/scripts/python/ntfy-listener.py topic-name
Name=ntfy-listener
StartupNotify=true
Terminal=false
Type=Application

KDE Shenanigans: Playing a random video from Dolphin

Dolphin, the KDE file manager, is great, and has grown to become my favorite file manager of all time. It's super customizable, and a joy to use, which is more than I can say for the Windows equivalent. I do a fair amount of file management, so having a good tool for this is important, and when it's extensible like Dolphin, that's when it really starts to shine.

I recently got the idea to make a script that will play a random video file from a given directory tree. Some possible use cases for this is to play a random episode of a TV show, or a random home recording stored on your computer. Making the script itself was fairly straight-forward, but I don't want to open up the terminal to launch my script every time I want to use it, and I have enough keyboard shortcuts for things already (the most important one being Meta+Z, which plays a rimshot sound effect, much to the amusement of everyone I know).

Naturally, I started looking into integrating this into Dolphin. Initially, I wanted to make a custom toolbar button, but it turns out that isn't possible. What you can do however, is make a KDE Service Menu! These live in the context menu that pops up whenever your right-click things. They are really easy to create as well, you just pop a suitable .desktop file in the right directory, make it executable, and presto! You got yourself a context menu item! Let's see how to accomplish this.

Making the script

First of all, let's make the script itself. There are many ways to go about this, and I just went with the most straight-forward way I could think of; recursively reading the files of the current directory, filtering them on extension, and picking a random one out of the list.

playrandomvideo.sh:

#!/bin/bash
shopt -s nullglob nocasematch
matches=$(find . -print | grep -i -E "\.(webm|mkv|ogv|mov|avi|qt|ts|wmv|mp4|m4v|mpg|mp2|mpeg|mpe|mpv|flv)$" --color=none)
IFS=$'\n'
read -r -d '' -a matchedFiles <<< "$matches"
numFiles=${#matchedFiles[@]}

if [[ "$numFiles" -gt "0" ]] ; then
    rand=$((0 + $RANDOM % $numFiles))
    randFile=${matchedFiles[${rand}]}
    xdg-open "$randFile"
    exit 0
else
    kdialog --sorry "No videos found in the current directory tree."
    exit 1
fi

Note that if you use some esoteric video format that is not included in the regex pattern on line 3 of the script, you can just add it. You can also replace the list of file extensions entirely if you want to adapt the script to opening a different type of content; why not live life on the cutting edge and replace it with ppt|pptx|odp, so the next time you have a presentation at work, you won't know what you're presenting until you start it? Way to keep yourself on your toes.

Place it somewhere safe, like /opt/scripts, and make it executable with chmod +x playrandomvideo.sh.

Making the service menu

Prior to doing this, I didn't know how to create service menus, but KDE has great documentation on how to do that.

First, find the location of service menus on your system, and cd into it. Create playrandomvideo.desktop, and make it executable.

$ qtpaths --locate-dirs GenericDataLocation kio/servicemenus
/usr/share/kio/servicemenus
$ cd /usr/share/kio/servicemenus
$ sudo touch playrandomvideo.desktop
$ sudo chmod +x playrandomvideo.desktop

Note that if your path is in your home directory, you do not need to use sudo to touch and chmod the file.

Now open the file in your favourite text editor, and populate it with the following:

playrandomvideo.desktop:

[Desktop Entry]
Type=Service
MimeType=inode/directory;
Actions=playRandomVideoFromHere
X-KDE-Priority=TopLevel

[Desktop Action playRandomVideoFromHere]
Name=Play random video from here
Icon=media-playback-start
Exec=cd "%u"; /opt/scripts/playrandomvideo.sh

Change the contents of the last line to match where you placed the script we made earlier.

The line X-KDE-Priority=TopLevel is optional. If you keep it, the context menu entry will appear at the top level of the context menu, like so:

If you omit the line, the context menu item will live under a submenu named "Actions":

Done!

Now you can right click any folder, or any empty area of the current folder, and click "Play random video from here" to do just that. The video will open in your system default handler for its respective file type (using xdg-open). If no videos are found, you'll be notified via a dialog box.


Sending arbitrary files directly from Firefox to your phone

The task

Automation is great. There's just something inherently beautiful about the process of stringing together a bunch of software, services, or tools to attain a simple goal, and finding a solid solution that just works™. One automation task I've been tinkering with lately is how to send an arbitrary file directly from my browser to my phone, with as little fuss as possible. I often browse reddit or just the web in general and find a funny video or image I want to keep on my phone to send to someone, or just to easily refer to back later. If I can just click a button and nearly immediately have a copy of the resource in question available on my phone, that would be really swell.

Luckily, the world of open source software provides a multitude of ways to accomplish this task; here's how I did it.

The requirements

To follow along at home, you'll need:

  • A Linux-based computer
  • An Android-based smartphone
  • Firefox on your PC
  • The Open With addon for Firefox
  • yt-dlp (or youtube-dl or any of its forks) on your PC
  • KDE Connect on your PC (ships with the KDE Plasma desktop, or can be installed on most other DEs through your package manager)
  • KDE Connect on your phone
  • Optional: libnotify for notifications, pulseaudio for audio alerts

The solution

First, install the Open With addon into Firefox. Once that's done, follow the instructions it gives to set it up, it requires a helper script to be able to launch external resources from within Firefox. Install the KDE Connect app on your phone, and pair it with your computer. Now that that's set up, you can make a couple of scripts that the Firefox addon will run whenever you invoke it. The first one is specifically for video content, the second is for files.

send-to-phone-yt-dlp.sh:

#!/bin/bash
deviceName="Fold 3"
ytdlpPath="/opt/yt-dlp"
savePath="/home/lars/Downloads/%(title)s [%(id)s].%(ext)s"
errorSound="/usr/share/sounds/ubuntu/notifications/Slick.ogg"
successSound="/usr/share/sounds/ubuntu/notifications/Positive.ogg"

notify-send -u low "yt-dlp" "Starting download with yt-dlp..." --icon=camera-video
ytdlpOutput=$($ytdlpPath -o "$savePath" "$1" 2>&1)

if [[ "$?" -gt 0 ]] ; then
    ytdlpOutput=$(echo $ytdlpOutput | tail -n1)
    notify-send -u normal "Error" "${ytdlpOutput}" --icon=emblem-warning
    paplay $errorSound
else
    notify-send -u normal "Success" "Download successful! ($1)" --icon=emblem-success
    fileNameResult=$($ytdlpPath --get-filename -o "$savePath" "$1")
    kdeconnect-cli -n "$deviceName" --share "$fileNameResult"
    paplay $successSound
fi

send-to-phone-wget.sh:

#!/bin/bash
deviceName="Fold 3"
saveDir="/home/lars/Downloads"
errorSound="/usr/share/sounds/ubuntu/notifications/Slick.ogg"
successSound="/usr/share/sounds/ubuntu/notifications/Positive.ogg"

notify-send -u low "Download" "Starting download with wget..." --icon=unknown
cd $saveDir
dlFilename=$(wget "$1" 2>&1 | grep Saving | cut -d ' ' -f 3 | sed -e 's/[^A-Za-z0-9._-]//g')

if [[ "$?" -gt 0 ]] ; then
    notify-send -u normal "Error" "Download failed!" --icon=emblem-warning
    paplay "$errorSound"
else
    notify-send -u normal "Success" "Download successful! ($1)" --icon=emblem-success
    kdeconnect-cli -n "$deviceName" --share "$dlFilename"
    paplay "$successSound"
fi

You'll need to do some changes to these scripts depending on your environment:

  • Change the value of deviceName to the registered name of your phone in KDE Connect
  • Change the value of ytdlpPath to point to the yt-dlp binary on your system
  • Change the value of savePath to point to your preferred save location and filename of the videos downloaded by yt-dlp
  • Change the value of saveDir to point to your preferred save directory of the files downloaded by wget
  • Change the value of errorSound and successSound to the appropriate paths if you are not running a flavour of Ubuntu, or remove them altogether if you do not want audio feedback. In that case, remove all lines starting with paplay as well
  • Replace the lines starting with paplay with appropriate commands for your audio system if you do not use PulseAudio, but still want audio feedback
  • Remove the lines starting with notify-send if you do not want notifications or if you don't have libnotify installed

Don't forget to make the scripts executable! (chmod u+x /path/to/script.sh). Place them somewhere safe, i like /opt/scripts.

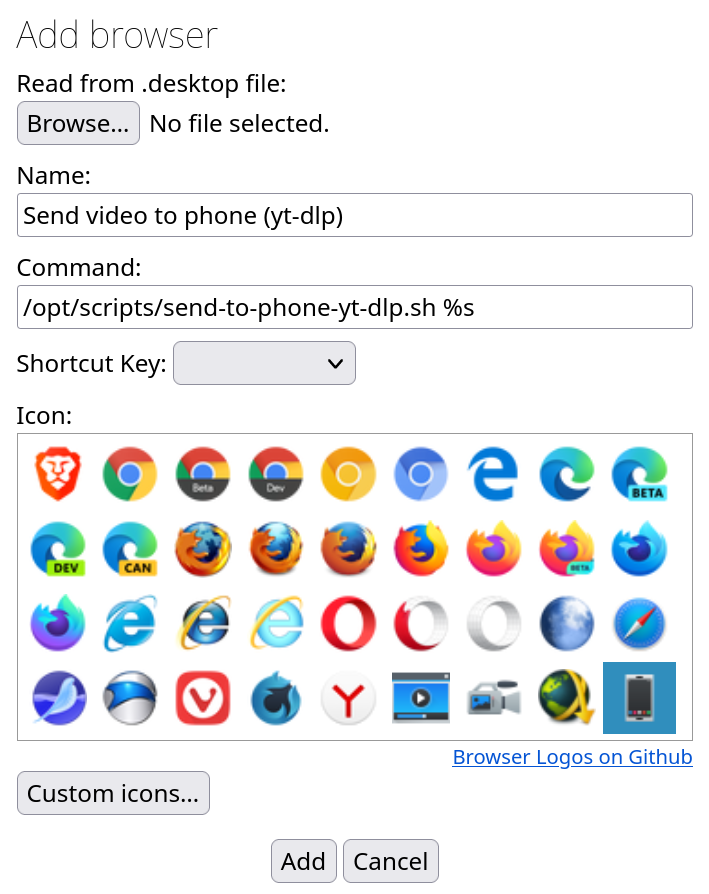
The next step is adding these scripts inside the Open With addon for Firefox. Click the Open With button in the toolbar, and click "Open With options". Click "Add browser". Fill in a name, and the path to the script with "%s" at the end, this is replaced with the URL when the script is invoked. Pick a custom icon if you'd like.

Repeat the same process for the other script, and you should end up with these two entries:

And that's really all there is to it. Now, whenever you are on a page that has a video you want to download and send to your phone, you can click the Open With toolbar icon, then "Send video to phone". If you're viewing a file, click the corresponding Open With item. This also works for links; If there's a link to an image or a file you want to download and send to your phone, just right click the link, go to "Open With", and click "Send file to phone (wget)", or pick the corresponding option if the link is to a video page.

Closing thoughts

Being able to send any video, picture or arbitrary file to my phone in two clicks is really convenient! The Open With addon is also really great for automating many other tasks that involve URLs, here are a couple of examples:

  • If a page doesn't behave/work in Firefox, I wanna open it in another browser. I have the Flatpak version of Ungoogled Chromium installed for that, but opening that, manually copying the URL from FF, tabbing over to Chromium, then pasting it in the address bar is a chore. Just add it to Open With: flatpak run com.github.Eloston.UngoogledChromium %s, and two clicks will open your current URL in the other browser (Note that this will NOT work if Firefox is running as a Flatpak, as flatpak run executed from within another flatpak will silently fail, in my experience, even with full permissions).
  • If I wanna send a link to JDownloader instead of opening it in Firefox, I can just add JDownloader to Open With, with the command /bin/sh /opt/jd2/JDownloader2 %s

I'm sure there are many other uses for this approach as well, get creative!


qBittorrent v4.5.0: The Hitchhiker's Guide to Legible Text

The story so far: In the beginning, qBittorrent was created. Then they released v4.5.0. This has made a lot of people very angry and been widely regarded as a bad move.

(If you just want the theme file with completely white text colors, you can download that here. Place it somewhere safe, then open qBT, and go to Tools > Preferences > Behaviour and check the checkbox for "Use custom UI theme". Then browse to the theme file, click OK, and restart qBT)

Update 2023-03-22: ZippyShare is shutting down, so the link now points to MultiUp, which uploads to multiple services.

The problem

The very bad move in this case, was hard-coding foreground colours, while simultaneously not hard-coding background colours. Most, if not all, operating systems in use today will let you choose a theme for your apps, so you can probably see how this quickly becomes a problem. If your app's hard-coded foreground colour has poor contrast with the user's chosen background colour, the user is gonna have a bad time. Sure, they can change their background colour by changing their theme, but why should the user be forced to change their whole system theme because of one app that disregards user choice? So when the eminent qBT team decided to hard-code only one of these, anyone who uses a dark theme in their OS, immediately got problems.

I am a proud KDE user, and like any proud basement-dwelling nerd, I use a dark theme. This dark theme isn't even an obscure, home-brewed one, it is Breeze Dark, which ships with KDE. This works exceptionally well, and disregarding the odd Java app, it works for all apps, mostly regardless of the UI toolkit used to make them. GTK apps, check. Qt apps, check.

But wait... qBittorrent is a Qt app, right? That's right, qBT is built with Qt on all platforms. This is great both for the developers who only have to deal with one toolkit, and for the users who can expect a more or less consistent experience across platforms.

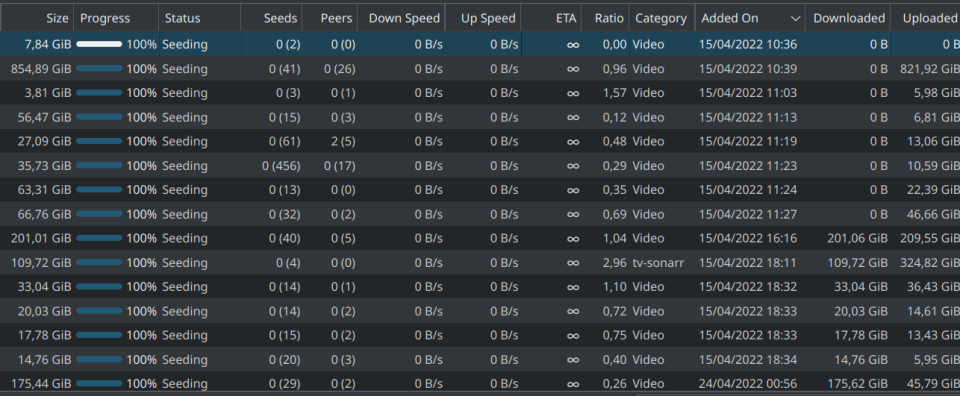
Now let's move on to the evidence phase. Consider the following. This is a screenshot of qBitTorrent v4.3.9 (or as I like to call it, "pre-fuckening"):

Wow, so legible! White text on a dark gray background has really good contrast, and makes the text stand out, so it's super readable. If I switch to the normal Breeze theme, the background will turn white, and the text will turn black. So logical! It respects my global OS theme! Yay!

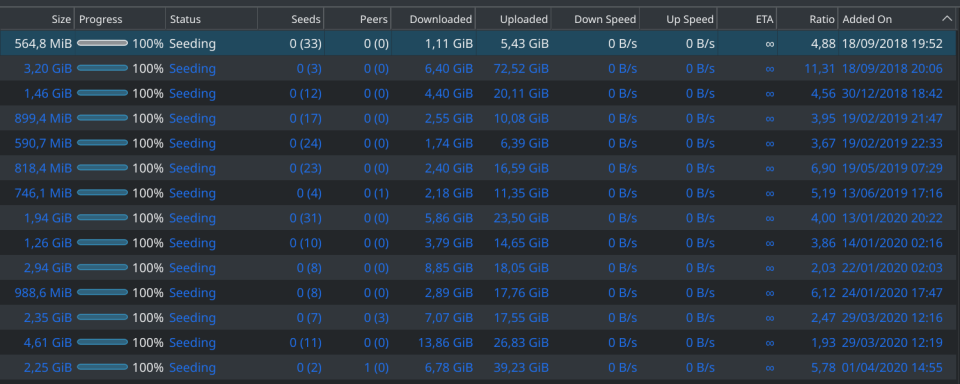
But then, through the magic of sudo pkcon update and restarting my computer, on the next launch of qBT, I am met with this horrible sight:

I'm not gonna lie; when I saw this, I let out an audible "what the fuck is this?". Like a lot of people, I have astigmatism and am near-sighted. If you sit right next to your monitor and have 20/20 vision, then yeah, sure, you might be able to read this. But the fact is, over a fourth of the global population currently has some sort of visual impairment, and if they live long enough, literally everyone will develop a vision impairment during their lifetime. The contrast is non-existent; dark blue against a dark gray (or black) background is absolute dogshit for legibility.

Surely, when they decided that L'ard-core Deep Bleu is the new default text colour for everyone, someone must've chimed up with something along the lines of "but let it be optional" or "let's at least include a colour picker or an option to revert to theme-default colours". No. Of course not. That would be dumb and they would not get invited to the proverbial open-source Christmas party.

Put briefly: A normal end user cannot do anything about this without significant effort. No option to revert, no option to change colours, no option to ignore built-in theming and use the OS theme. A normal end user that now cannot read their app anymore will either a) uninstall and use an alternative client, b) downgrade to a previous version, or c) try to find a workaround. All of which are bad for UX. A user should not be forced to downgrade or replace the app in order to read basic, informational text.

The solution

Some web searching will reveal that there are custom themes available for qBT. And that is an okay workaround. The problem is, all these custom themes change the whole look of the application, and thus also ignore the user's system defined theme. But also, v4.5.0 broke most of these custom themes. So, what do we do about this? After trawling through some poorly documented ways of creating themes, I was finally able to make a simple one that only changes the text colors, nothing else. Here is how I did it.

I started here. Which has an okay-ish explanation of how themes work and how the markup is written, but not much info about how to make the actual theme file, until you find the link to this, which is made, quote, "for the easy creation of .qbttheme files". So sure, I download the Python script and attempt to run it, only to be barraged by error messages about missing resources.

I think "whatever" and start working on the actual code. I read through the documentation which tells me stylesheet.qss is required and tells me a bunch of the rules to put in there, but at the end tells me "jk lol disregard all that and put this in your config file instead". What a waste of time. I make an empty stylesheet.qss and populate config.json with the following:

{
    "colors": {
        "TransferList.Downloading": "#FFFFFF",
        "TransferList.StalledDownloading": "#FFFFFF",
        "TransferList.DownloadingMetadata": "#FFFFFF",
        "TransferList.ForcedDownloading": "#FFFFFF",
        "TransferList.Allocating": "#FFFFFF",
        "TransferList.Uploading": "#FFFFFF",
        "TransferList.StalledUploading": "#FFFFFF",
        "TransferList.ForcedUploading": "#FFFFFF",
        "TransferList.QueuedDownloading": "#FFFFFF",
        "TransferList.QueuedUploading": "#FFFFFF",
        "TransferList.CheckingDownloading": "#FFFFFF",
        "TransferList.CheckingUploading": "#FFFFFF",
        "TransferList.CheckingResumeData": "#FFFFFF",
        "TransferList.PausedDownloading": "#FFFFFF",
        "TransferList.PausedUploading": "#FFFFFF",
        "TransferList.Moving": "#FFFFFF",
        "TransferList.MissingFiles": "#FFFFFF",
        "TransferList.Error": "#FFFFFF"     
    }
}

As you can probably tell, I copy pasted the list from the documentation and made all the text colours pure white. That's the only change I want, because it's the only forced change that made a huge difference to someone who can't tell a frog from a lawn chair, without glasses.

Great! Now I have a zero-byte stylesheet.qss and a config.json with some actual changes in it. Let's get it packed up into a .qbtheme!

Oh, right. The python script spat out a bunch of errors. I don't know Python, but I know other programming languages, and I'm generally able work my way around this sort of stuff. Apparently the errors are because you don't need just this script, you need to clone the whole repository, which isn't mentioned anywhere. Fine, one git clone https://github.com/jagannatharjun/qbt-theme later, I have a directory full of god knows what. I cd to the right directory and try again, with the following syntax:

python make-resource.py -style stylesheet.qss -config config.json

But in return, I get this:

/Builds/tools/rcc -binary -o style.qbtheme resources.qrc
Traceback (most recent call last):
  File "make-resource.py", line 80, in <module>
    if not subprocess.call(cmd):
  File "/usr/lib/python2.7/subprocess.py", line 172, in call
    return Popen(*popenargs, **kwargs).wait()
  File "/usr/lib/python2.7/subprocess.py", line 394, in __init__
    errread, errwrite)
  File "/usr/lib/python2.7/subprocess.py", line 1047, in _execute_child
    raise child_exception
OSError: [Errno 2] No such file or directory

(Note the beautifully named python function _execute_child, which is coincidentally what I want to do when I have to spend time on debugging code for a language I don't know)

Right. Line 80 it says. Line 80 of make-resource.py reads as follows:

if not subprocess.call(cmd):

Clearly, cmd is a variable, which is coincidentally defined a few lines above, on line 77:

cmd = [os.path.join(os.path.dirname(os.path.realpath(__file__)), 'tools/rcc'), '-binary', '-o', args.output, 'resources.qrc']

What I gather from this, is that the script is attempting to call a binary located at tools/rcc. But the error Python spits out is No such file or directory, do I have to supply this mysterious binary myself? Huh? That's when I decide to look inside the tools directory.

$ ls -lah
total 1,1M
drwxrwxr-x 2 lars lars 4,0K Jan  3 12:34 .
drwxrwxr-x 8 lars lars 4,0K Jan  3 12:35 ..
-rw-rw-r-- 1 lars lars 1,1M Jan  3 12:34 rcc.exe

rcc.exe. Real bruh moment. Instead of checking for OS or giving a useful error message, this repository bundles a Windows binary of rcc. But what is rcc I wonder? A web search tells me that rcc stands for Renal cell carcinoma, and I'm sure if I keep reading, I'll find out I have it. I have a big brain moment and add "qt" to the search, and find out that RCC is the Qt Resource Compiler. That makes sense, and I probably have this somewhere already since I run KDE, right?

$ whereis rcc
rcc: /usr/bin/rcc

Yay, I already have it installed on my system! I change line 77 of make-resource.py to:

cmd = ['rcc', '-binary', '-o', args.output, 'resources.qrc']

I save make-resource.py as a new file, then run it again with the appropriate arguments, and voilĂ ! It works!

$ python make-resource-linux.py -style stylesheet.qss -config config.json
adding ./make-resource-linux.py
adding ./config.json
adding ./stylesheet.qss
[]
rcc -binary -o style.qbtheme resources.qrc
resources.qrc: Warning: potential duplicate alias detected: 'stylesheet.qss'
resources.qrc: Warning: potential duplicate alias detected: 'config.json'

For some reason the script added itself to the resource file, but whatever. I save the resulting .qbtheme-file as ~/.local/bin/style.qbtheme for safekeeping, then I apply the theme in qBittorrent.

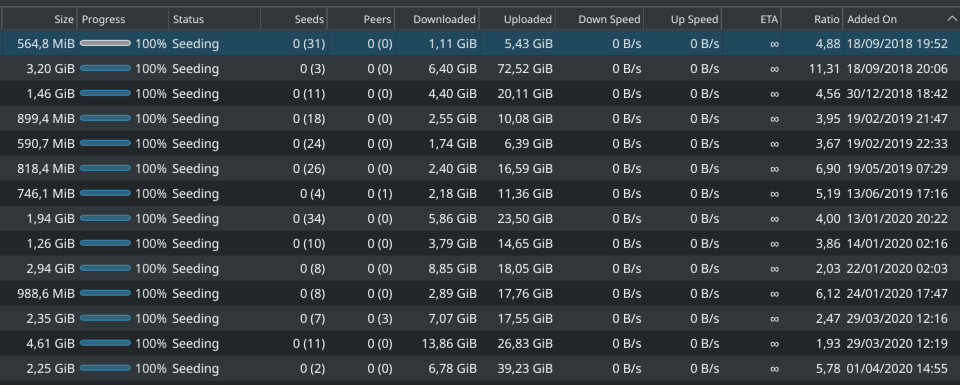
Tada! It works!

Doesn't that look just positively lovely?

The conclusion

Now, this task, making previously white text white again, took me, a technical person, a non-negligible amount of time to figure out (on the magnitude of an hour or two). How is it expected that a normal, non-technical end user is supposed to accomplish this same task before the heat death of the universe? Why do they have to in the first place?

Please, for the love of all that is good and decent in this world, the next time you force a visual change upon users, include a colour picker option to let the user override your choices, or, you know, respect the system theme. I appreciate that qBT is free and open-source software and that resources are limited, but this is UX 101. If you define one colour, you have to define all colours. The best is to define none and let the user decide. Don't get me wrong, credit where credit is due: I love qBittorrent with a passion, and it is one of my single most-used pieces of software. Functionally, it is fantastic. That being said, hard-coding colours was a bad move.

You can download the resulting all-white-text .qbtheme-file here. Place it somewhere safe, then open qBT, and go to Tools > Preferences > Behaviour and check the checkbox for "Use custom UI theme". Then browse to the theme file, click OK, and restart qBittorrent.


Bash script: Randomize filenames in a directory

Continuing on the theme of file management from my last post: This script takes a folder of files and randomizes all filenames, whilst keeping the filename extension. This is useful if you're sorting by name, and want to have the files presented in a random order. Some possible use cases are a folder of pictures you intend to post to a blog, do further processing on, and the order and names of the files aren't important.

Usage: cd to the directory that contains the files you wish to randomize the filenames of, then run the script.

randomize_filenames.sh:

#!/bin/bash
# Randomize file names in current working directory, keeping the filename extension
# Modified from: https://unix.stackexchange.com/a/6553
# Ignores dotfiles and subdirectories

find . -type f -not -path '*/.*' |
while read -r name; do
  ext=${name##*/}
  case $ext in
    *.*) ext=.${ext##*.};;
    *) ext=;;
  esac
  newName=`mktemp --dry-run XXXXXXXXXXXXXXXXXXXXXXXXXXXXXXXX`
  mv "$name" "$newName$ext"
done