Posts tagged with “programming”

"Retrocorder" - Using a spare PC to make a fully automated retro-gaming recording solution

Persistent nostalgia

The past few months, I've spent some time to set up a room in my house to be a pretty sweet space dedicated to retro-gaming. This includes a vintage PC, a CRT TV, and a multitude of classic games consoles hooked up to four RCA/AV switches. This works well, and to play the console we want, one can just flip a couple of switches instead of having to unplug and shuffle around literally 8 different sets of RCA cables.

Thing is, when you're playing games, especially during couch coop, things tend to happen. Some of these things, depending on the types of games you play, can be utterly hilarious, and worth saving for posterity. With the two last generations of consoles I own, PS5, PS4 and the Nintendo Switch, you can just press a single button on the controller to save recent gameplay as a file to the system storage, which is awesome. When you also enjoy playing on 20-30 year old game consoles as well, this part becomes a bit trickier.

Emergent technologies

Enter: The "Retrocorder" - the dedicated computer I've set up to continuously record all retro gaming gameplay as it happens.

For reference, this is what my setup looked like before Retrocorder:
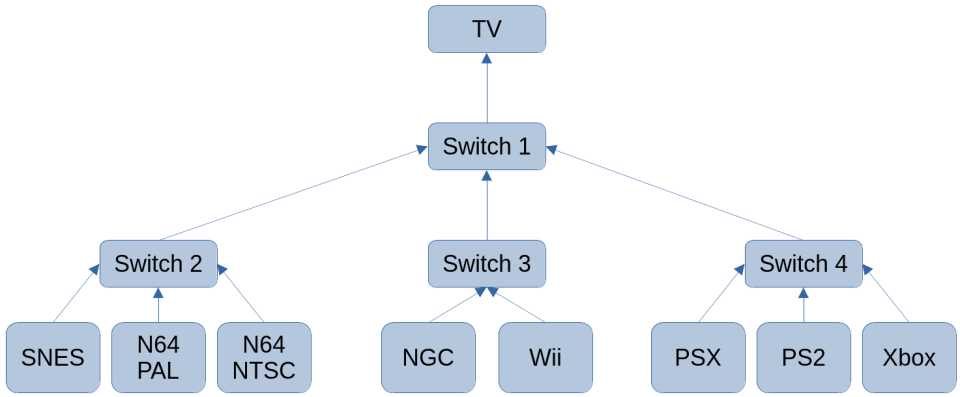
(If I stick with 3-port switches, I can only get one more console before I have to add another level to the hierarchy 😳)

Since all the signals involved here are analog, you'd think there would be some degradation at each step. That might be true, but none are perceptible to me in regards to image or sound quality, and the cables between the switches are short, minimizing signal loss.

Hardware

If you want to follow along at home, here's a parts list:

The above links are affiliate links. If you buy something using them, I may earn a small commission at no extra cost to you.

Using these parts, we can split the RCA cables right before the TV, and lead one end to the TV, and the other into our capture card, like so:

As you can see from the chart, the splitters are inserted between the first switch and the TV. This way, no latency is introduced to the TV, so we can play our games normally without any changes to our gameplay. We can also swap game consoles mid-session and have no interruptions to the video recording, since the video is captured from the first switch.

Regarding the 3-6x RCA cables listed: 3 of them go from the first split of the RCA Y splitter to the TV. As for the other 3 - depending on how your splitters and AV2HDMI box look, you may or may not need them. I was able to plug the second split of the RCA Y splitter directly into the AV2HDMI box without using the extra 3 cables - your mileage may vary.

The reason I recommend the HDMI capture card over the RCA/AV capture card, is because AV capture cards tend to have issues switching between NTSC and PAL video signals. I mix NTSC and PAL video signals all the time, as I own consoles and games of both regions. My CRT TV supports both signals, which isn't a given for any CRT TV either, so make sure yours does before you mix signals and end up with unusable video files. The HDMI route isn't immune to this issue either, but the AV2HDMI converter box seems to handle this a lot better, and seems to send the same signal to the capture card regardless of input. I also experienced horrible buzzing noises during recording when using my AV capture card, presumably due to interference, but that might be down to a faulty card that's been stored in a box for 10 years or more.

The AV2HDMI converter box works great, and will detect a change in signal automatically. In my testing and usage, I have found only one combination of consoles/game regions that will throw it for a loop - playing NTSC games on a PAL GameCube (via Swiss). This outputs a black and white, wavy signal from the AV2HDMI box, presumably because the GameCube is outputting an esoteric (or out-of-sync) signal that it doesn't quite understand. The TV shows the signal just fine, however. Playing PAL games on the same console works fine, so I've solved this issue by just using PAL games instead. The PS2, where I also mix NTSC and PAL games on a PAL console, does not exhibit this problem, and both regions display fine when captured.

Software

Now that all the hardware is plugged together, it's time to make this as seamless as possible using software.

For the operating system, I use my default go-to for projects such as these: The latest Kubuntu LTS. KDE is my favourite desktop environment, I'm very familiar with it at this point, and the Ubuntu LTS base provides a solid foundation.

The hardware of the PC is modest, as this is an ancient PC that I used as a daily driver 10 or so years ago, only upgraded with an SSD:

  • CPU: AMD FX-6100 Six-core @ 3.300GHz
  • GPU: AMD ATI Radeon HD 7870 GHz Edition
  • RAM: 8 GB
  • SSD: 128 GB

After installation, we can start installing some software, and setting some desired options.

I've installed the following:

  • NoMachine - for remote access from my main PC
  • OBS Studio
  • obs-cli - Make sure you get you get the one from pschmitt - the other ones I've found are all defective or outdated

Now, set up your scene in OBS. At the bottom, add a new video source.
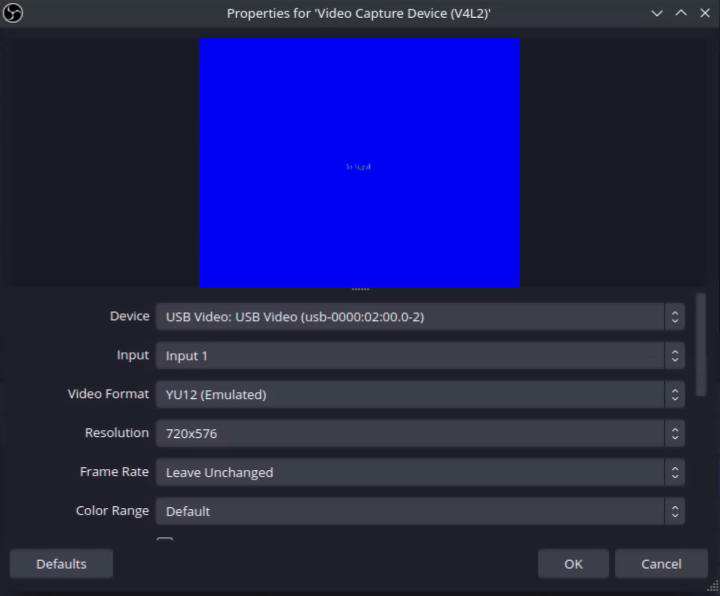
I had to pick YU12 to get the correct image for my setup, but yours may be different. The AV2HDMI converter box outputs a 720p or 1080p signal, configurable by a physical switch on the unit itself. I set mine to 720p, and the recording resolution to 576p, as no console in my setup outputs anything higher than that over AV anyway.

Now that that's out of the way, we just need to configure a few things about the recording environment. In OBS, go to File > Settings, then Output, and set Output Mode to Advanced. Click the Recording tab, then set your desired settings:
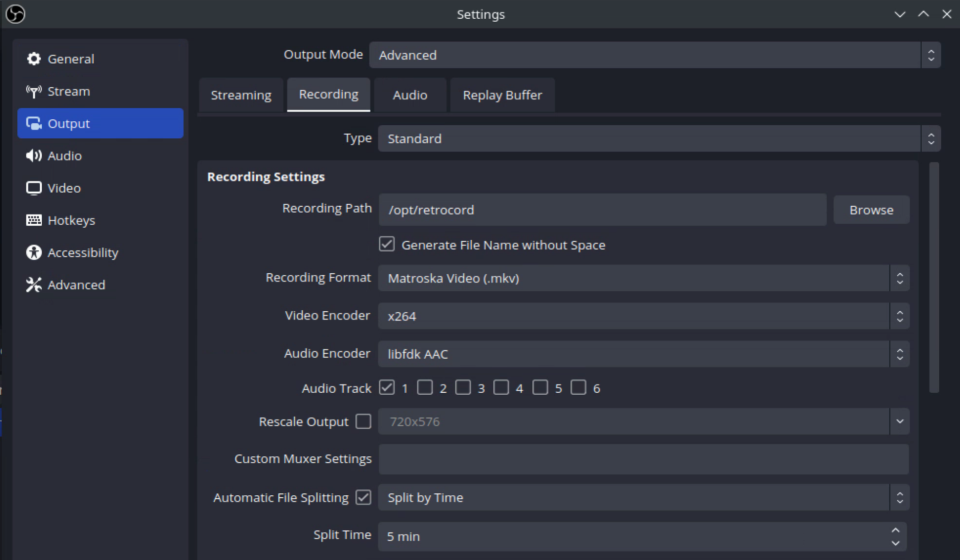
My changes from the default:

  • I've used /opt/retrocord as the folder to store all my recordings.
  • I've checked "Generate File Name without Space"
  • I've set the video encoder to x264 as it is light on CPU and produces files of a manageable size
  • I've enabled "Automatic File Splitting"
  • I've set "Split Time" to 5 min

The reason I've enabled automatic file splitting is twofold: To not end up with files of gargantuan sizes, and to let me delete older files in the directory when it becomes too large, without having to split file and review what I want to save.

Click OK. Next, choose Tools in the menu bar, then click WebSocket Server Settings. Check Enable WebSocket server, then click Show Connect Info. Note down the Server Port and the Server Password, as you'll be needing it soon. Close the connection info window and click OK in the WebSocket Server window.

Scripting scripts

Your recording environment should now be ready to use. The next step is to automate this, so you don't need to manually interact with OBS to make it do its thing. I accomplish this using two scripts; a login script and a logout script.

/opt/scripts/retrocorder-start.sh:

#!/usr/bin/env bash
obs --startrecording &

/opt/scripts/retrocorder-stop.sh:

#!/usr/bin/env bash
obs-cli --host localhost --port 4455 --password abcde12345 record stop
sleep 1
kill -s TERM "$(pidof obs)"
sync

In retrocorder-stop.sh, you need to change two values in the second line: the port and the password that you noted down earlier (4455 and abcde12345 in the example above). The reason we need obs-cli in the first place and the OBS WebSocket Server to be running, is that while OBS can let you send it an argument to start recording, it has no such argument to stop the recording in progress (for some god-awful reason).

As you might have noticed, this setup might end up with a full disk after enough usage, so we're gonna have to deal with that with another script. This time, we're gonna set up a cron job to be run once an hour, to prune the oldest videos in the recording directory, once a size threshold has been exceeded:

/opt/scripts/retrocorder-prune.sh:

#!/usr/bin/env bash
cd /opt/retrocord || exit
limitBytes=$((50*1024*1024*1024)) # 50 GiB

currentDirSize="$(du -bs | awk '{print $1}')"
if [[ "$currentDirSize" -gt "$limitBytes" ]]; then
    while [[ "$currentDirSize" -gt "$limitBytes" ]]; do
    purgeFile=$(ls -rt *.mkv | head -n 1)
    rm "$purgeFile"
    currentDirSize="$(du -bs | awk '{print $1}')"
    done
fi

This script deletes the oldest files in a directory until the total directory size is less than 50 GiB. Change the second line of the script to point to your recording directory, and the third line to reflect how much disk space you'd like to allocate to recordings. I've set mine to 50 GiB, as that is plenty, and leaves lots of headroom on the 128 GB SSD.

On my setup, 5 mins of recording equals around 100 MiB. This means that I can record > 42 hours of gameplay before the script starts purging - more than enough time to save any clips I want to keep!

Quick maffs 50 GiB * 1024 MiB per GiB = 512,000 MiB allocated

512,000 MiB / 100 MiB per 5 mins = 512 files á 100 MiB
512 files * 5 minutes per file = 2560 minutes
2560 minutes ≈ 42.66 hours ≈ 1.77 days


Finally, put the script in your crontab. First, edit your crontab:

$ crontab -e

Then append a new line at the end of the file:

0 * * * * /opt/scripts/retrocorder-prune.sh

Save and close the file (if the editor is nano, press, Ctrl+X, then Y, then Enter).

This will make the script run once an hour.

Setting settings

Note: These settings are for KDE Plasma. There are most likely equivalents for these settings in all other major DEs.

Once the above scripts are created, in Plasma, go to System Settings > Startup and Shutdown > Autostart. Click Add at the bottom of the window, then pick Add Login Script. Navigate to and pick /opt/script/retrocorder-start.sh. Now do the same for the logout script: Click Add > Add Logout Script, then navigate to and pick /opt/scripts/retrocorder-stop.sh. This will automatically start and stop recording when you log in and out of the computer.

To make this completely automatic, you'll also need to make sure you're automatically logged in to the computer. Also in Startup and Shutdown, pick Login Screen (SDDM), then click the button labeled Behaviour on the bottom left. Next, check the box next to Automatic log in, then choose your user and session on the same line. Click Apply.

Also in Startup and Shutdown, pick Desktop Session, then uncheck the box next to Logout Screen - Show. This makes sure when you request a shutdown, it is done immediately.

The next destination is still in System Settings, under Power Management this time (called Energy Saving in earlier versions of Plasma). Uncheck all checkboxes, then check Button events handling. In the drop-down box When power button pressed, pick Shut down.

Lastly, if you wish access this computer over SSH, install and enable openssh-server:

$ sudo apt update
$ sudo apt install openssh-server
$ sudo ufw allow ssh

This allows you to log in remotely via SSH. Additionally, it lets you use FISH to easily copy files from the Retrocorder to your main machine; SSH-enabled servers can be accessed in Dolphin by using the fish: URI scheme in the address bar:

fish://192.168.0.123/

You could also set up an NFS or SMB share, but that's out of scope for this post.

Headless chicken

Note: This section mostly applies to desktop PCs. If you're using a laptop, you're more or less done.

At this point you should be in a state where everything is automatic. Starting with the PC off, when you press the power button, the computer will boot, log you in, start OBS and start recording. Once an hour, your recording directory will be checked, and if it's too big, the oldest files will be deleted. OBS will keep recording until you hit the power button. Once you hit the power button, OBS will stop recording, close, the disks will sync, and the computer will turn off.

Wouldn't it be cool if you didn't need that pesky monitor, keyboard and mouse?

In most cases, if you don't have a display attached, the computer will not boot to a graphical environment. There's two ways to fix this, either by creating a dummy display (Xorg only), or by getting a physical dummy connector which will fool your computer into thinking a display is attached. There are dummy connectors available for all sorts of display connectors, but this post will focus on the software solution, as it works great for me.

This following solution only works on Xorg. I don't know if Wayland has an equivalent method of making a dummy display, but I'm sure you could find something by searching the web.

Create the following file:

/usr/share/X11/xorg.conf.d/xorg.conf:

Section "Device"
    Identifier  "Configured Video Device"
    Driver      "dummy"
EndSection

Section "Monitor"
    Identifier  "Configured Monitor"
    HorizSync 31.5-48.5
    VertRefresh 50-70
EndSection

Section "Screen"
    Identifier  "Default Screen"
    Monitor     "Configured Monitor"
    Device      "Configured Video Device"
    DefaultDepth 24
    SubSection "Display"
    Depth 24
    Modes "1280x720"
    EndSubSection
EndSection

If you're not on *ubuntu, xorg.conf might live somewhere else, such as /etx/X11/xorg.conf. In many cases, it doesn't exist and must be created - searching the web is your friend again here.

Save this file, which configures a dummy 1280x720 display. In my experience, increasing the resolution doesn't do anything, the dummy display seems to max out at that resolution.

Restart your computer, and recording should now start, even without a display attached! It will also enable you to remote control the desktop using NoMachine or equivalent remote control software.

You should now have a fully automated recording solution for your retro gaming setup! :) The only thing you need to do now is press the power button to turn the computer on and start recording, and press it again to shut down when you're done.

Here's a sample of gameplay recorded from my Retrocorder. It's by no means perfect, but it's more than good enough for my purposes - saving fun or memorable bits of gameplay. This clip is me playing the 2006 PS2 game Black:

YouTube truncates this to 480p, so if you want the source file, you can get it here!

Closing thoughts

The first time I tried booting my PC after setting up the dummy display, it would not start up, much to my annoyance. Turns out this motherboard is one of those who will halt the boot process if a keyboard isn't connected - easily fixed by changing the BIOS settings not to halt on keyboard errors.

This was a fun project to set up!


Quickie: Using hdldump to transfer PS2 HDD games under Linux

The PS2 homebrew scene is an absolute mess, and whenever I try to find any information on any operation about it online, I find the following:

  • A truckload of conflicting information
  • A myriad of different guides spanning back 20 years
  • A bushel of different software tools, none of which are usually available on Linux
  • And a partridge in a pear tree

This time, all I needed to do was to figure out how to get my ISO and BIN/CUE PS2 backups onto an internal HDD for playing through Open PS2 Loader (OPL). All of the above points of note came into play, but after digging and sorting through it all for a bit, I found a reasonable way to do this without having to involve a Windows computer:

  1. HDL Dump Helper GUI includes a Linux x86 build of hdldump. Grab it from PSX-Place.
  2. Extract the rar, move hdld_2_3/files/hdl_dump_090 to /usr/bin/hdldump
  3. chmod +x /usr/bin/hdldump
  4. You now have hdldump for Linux CLI, hooray!

Every guide I looked at said that one of the downsides of hdldump is that it doesn't do batch operations. Who needs built-in batch operations when you have Bash?

/opt/scripts/batch_hdl.sh:

#!/bin/bash
shopt -s nullglob nocasematch

for i in *.iso
do
    gameName="${i%.*}"
    echo "Injecting ${gameName}..."
    hdldump inject_dvd "$1" "${gameName}" "${i}"
    echo "Finished injecting ${gameName}."
done

for i in *.cue
do
    gameName="${i%.*}"
    echo "Injecting ${gameName}..."
    hdldump inject_cd "$1" "${gameName}" "${i}"
    echo "Finished injecting ${gameName}."
done

Presto. Make the script executable (chmod +x batch_hdl.sh), cd to the directory with your games, then run the script with your PS2 HDD as the only argument.

For added pizzazz, put alias hdlbatch="/opt/scripts/batch_hdl.sh" in your ~/.bashrc or ~/.bash_aliases, then source ~/.bashrc/source ~/.bash_aliases. Now you can run the script from any directory using hdlbatch /dev/sdg to pump that HDD chock full of more games you'll never play.

$ hdlbatch /dev/sdg
Injecting Beyond Good & Evil...
Finished injecting Beyond Good & Evil.
Injecting Burnout 3 - Takedown...
Finished injecting Burnout 3 - Takedown
[...]

ntfy: Send notifications through libnotify to Linux desktop

I've recently started using ntfy to send notifications to my phone from some scripts I'm running on my home NAS. This works great, but when I'm on my PC, I'd rather get notifications there instead of on the phone. There doesn't seem to be a desktop app for ntfy, but luckily the API is extremely simple. I've also recently started picking up Python, so I decided to whip together a simple ntfy notification delivery system for the Linux desktop. To use this, you need notify-send (provided by the libnotify package), and python3.

ntfy-listener.py:

from sys import argv
import requests
import json
import subprocess

# Sends desktop notifications to a subscribed ntfy topic through libnotify/notify-send
# Usage: python3 ntfy-listener.py topic-name

if len(argv) > 1:
    try:
        resp = requests.get(f"https://ntfy.sh/{argv[1]}/json", stream=True)
        for line in resp.iter_lines():
            if line:
                ntfyData = json.loads(line)
                if ntfyData["event"] == "message":
                    ntfyTitle = "ntfy"
                    if "title" in ntfyData:
                        ntfyTitle = ntfyData["title"]
                    subprocess.run(["notify-send", "-u", "normal", ntfyTitle, ntfyData["message"]])
    except KeyboardInterrupt:
        exit()
    except Exception as e:
        print(e)

Launch the script with python3 ntfy-listener.py ntfy-topic-name , where ntfy-topic-name is the ntfy topic you'd like to subscribe to, and any incoming notifications will be delivered though your DE's notification system! I've additionally added it to KDE's autostart, so it loads in the background when I log in:

~/.config/autostart/ntfy-listener.desktop:

[Desktop Entry]
Exec=python3 /opt/scripts/python/ntfy-listener.py topic-name
Name=ntfy-listener
StartupNotify=true
Terminal=false
Type=Application

KDE Shenanigans: Playing a random video from Dolphin

Dolphin, the KDE file manager, is great, and has grown to become my favorite file manager of all time. It's super customizable, and a joy to use, which is more than I can say for the Windows equivalent. I do a fair amount of file management, so having a good tool for this is important, and when it's extensible like Dolphin, that's when it really starts to shine.

I recently got the idea to make a script that will play a random video file from a given directory tree. Some possible use cases for this is to play a random episode of a TV show, or a random home recording stored on your computer. Making the script itself was fairly straight-forward, but I don't want to open up the terminal to launch my script every time I want to use it, and I have enough keyboard shortcuts for things already (the most important one being Meta+Z, which plays a rimshot sound effect, much to the amusement of everyone I know).

Naturally, I started looking into integrating this into Dolphin. Initially, I wanted to make a custom toolbar button, but it turns out that isn't possible. What you can do however, is make a KDE Service Menu! These live in the context menu that pops up whenever your right-click things. They are really easy to create as well, you just pop a suitable .desktop file in the right directory, make it executable, and presto! You got yourself a context menu item! Let's see how to accomplish this.

Making the script

First of all, let's make the script itself. There are many ways to go about this, and I just went with the most straight-forward way I could think of; recursively reading the files of the current directory, filtering them on extension, and picking a random one out of the list.

playrandomvideo.sh:

#!/bin/bash
shopt -s nullglob nocasematch
matches=$(find . -print | grep -i -E "\.(webm|mkv|ogv|mov|avi|qt|ts|wmv|mp4|m4v|mpg|mp2|mpeg|mpe|mpv|flv)$" --color=none)
IFS=$'\n'
read -r -d '' -a matchedFiles <<< "$matches"
numFiles=${#matchedFiles[@]}

if [[ "$numFiles" -gt "0" ]] ; then
    rand=$((0 + $RANDOM % $numFiles))
    randFile=${matchedFiles[${rand}]}
    xdg-open "$randFile"
    exit 0
else
    kdialog --sorry "No videos found in the current directory tree."
    exit 1
fi

Note that if you use some esoteric video format that is not included in the regex pattern on line 3 of the script, you can just add it. You can also replace the list of file extensions entirely if you want to adapt the script to opening a different type of content; why not live life on the cutting edge and replace it with ppt|pptx|odp, so the next time you have a presentation at work, you won't know what you're presenting until you start it? Way to keep yourself on your toes.

Place it somewhere safe, like /opt/scripts, and make it executable with chmod +x playrandomvideo.sh.

Making the service menu

Prior to doing this, I didn't know how to create service menus, but KDE has great documentation on how to do that.

First, find the location of service menus on your system, and cd into it. Create playrandomvideo.desktop, and make it executable.

$ qtpaths --locate-dirs GenericDataLocation kio/servicemenus
/usr/share/kio/servicemenus
$ cd /usr/share/kio/servicemenus
$ sudo touch playrandomvideo.desktop
$ sudo chmod +x playrandomvideo.desktop

Note that if your path is in your home directory, you do not need to use sudo to touch and chmod the file.

Now open the file in your favourite text editor, and populate it with the following:

playrandomvideo.desktop:

[Desktop Entry]
Type=Service
MimeType=inode/directory;
Actions=playRandomVideoFromHere
X-KDE-Priority=TopLevel

[Desktop Action playRandomVideoFromHere]
Name=Play random video from here
Icon=media-playback-start
Exec=cd "%u"; /opt/scripts/playrandomvideo.sh

Change the contents of the last line to match where you placed the script we made earlier.

The line X-KDE-Priority=TopLevel is optional. If you keep it, the context menu entry will appear at the top level of the context menu, like so:

If you omit the line, the context menu item will live under a submenu named "Actions":

Done!

Now you can right click any folder, or any empty area of the current folder, and click "Play random video from here" to do just that. The video will open in your system default handler for its respective file type (using xdg-open). If no videos are found, you'll be notified via a dialog box.


Sending arbitrary files directly from Firefox to your phone

The task

Automation is great. There's just something inherently beautiful about the process of stringing together a bunch of software, services, or tools to attain a simple goal, and finding a solid solution that just worksâ„¢. One automation task I've been tinkering with lately is how to send an arbitrary file directly from my browser to my phone, with as little fuss as possible. I often browse reddit or just the web in general and find a funny video or image I want to keep on my phone to send to someone, or just to easily refer to back later. If I can just click a button and nearly immediately have a copy of the resource in question available on my phone, that would be really swell.

Luckily, the world of open source software provides a multitude of ways to accomplish this task; here's how I did it.

The requirements

To follow along at home, you'll need:

  • A Linux-based computer
  • An Android-based smartphone
  • Firefox on your PC
  • The Open With addon for Firefox
  • yt-dlp (or youtube-dl or any of its forks) on your PC
  • KDE Connect on your PC (ships with the KDE Plasma desktop, or can be installed on most other DEs through your package manager)
  • KDE Connect on your phone
  • Optional: libnotify for notifications, pulseaudio for audio alerts

The solution

First, install the Open With addon into Firefox. Once that's done, follow the instructions it gives to set it up, it requires a helper script to be able to launch external resources from within Firefox. Install the KDE Connect app on your phone, and pair it with your computer. Now that that's set up, you can make a couple of scripts that the Firefox addon will run whenever you invoke it. The first one is specifically for video content, the second is for files.

send-to-phone-yt-dlp.sh:

#!/bin/bash
deviceName="Fold 3"
ytdlpPath="/opt/yt-dlp"
savePath="/home/lars/Downloads/%(title)s [%(id)s].%(ext)s"
errorSound="/usr/share/sounds/ubuntu/notifications/Slick.ogg"
successSound="/usr/share/sounds/ubuntu/notifications/Positive.ogg"

notify-send -u low "yt-dlp" "Starting download with yt-dlp..." --icon=camera-video
ytdlpOutput=$($ytdlpPath -o "$savePath" "$1" 2>&1)

if [[ "$?" -gt 0 ]] ; then
    ytdlpOutput=$(echo $ytdlpOutput | tail -n1)
    notify-send -u normal "Error" "${ytdlpOutput}" --icon=emblem-warning
    paplay $errorSound
else
    notify-send -u normal "Success" "Download successful! ($1)" --icon=emblem-success
    fileNameResult=$($ytdlpPath --get-filename -o "$savePath" "$1")
    kdeconnect-cli -n "$deviceName" --share "$fileNameResult"
    paplay $successSound
fi

send-to-phone-wget.sh:

#!/bin/bash
deviceName="Fold 3"
saveDir="/home/lars/Downloads"
errorSound="/usr/share/sounds/ubuntu/notifications/Slick.ogg"
successSound="/usr/share/sounds/ubuntu/notifications/Positive.ogg"

notify-send -u low "Download" "Starting download with wget..." --icon=unknown
cd $saveDir
dlFilename=$(wget "$1" 2>&1 | grep Saving | cut -d ' ' -f 3 | sed -e 's/[^A-Za-z0-9._-]//g')

if [[ "$?" -gt 0 ]] ; then
    notify-send -u normal "Error" "Download failed!" --icon=emblem-warning
    paplay "$errorSound"
else
    notify-send -u normal "Success" "Download successful! ($1)" --icon=emblem-success
    kdeconnect-cli -n "$deviceName" --share "$dlFilename"
    paplay "$successSound"
fi

You'll need to do some changes to these scripts depending on your environment:

  • Change the value of deviceName to the registered name of your phone in KDE Connect
  • Change the value of ytdlpPath to point to the yt-dlp binary on your system
  • Change the value of savePath to point to your preferred save location and filename of the videos downloaded by yt-dlp
  • Change the value of saveDir to point to your preferred save directory of the files downloaded by wget
  • Change the value of errorSound and successSound to the appropriate paths if you are not running a flavour of Ubuntu, or remove them altogether if you do not want audio feedback. In that case, remove all lines starting with paplay as well
  • Replace the lines starting with paplay with appropriate commands for your audio system if you do not use PulseAudio, but still want audio feedback
  • Remove the lines starting with notify-send if you do not want notifications or if you don't have libnotify installed

Don't forget to make the scripts executable! (chmod u+x /path/to/script.sh). Place them somewhere safe, i like /opt/scripts.

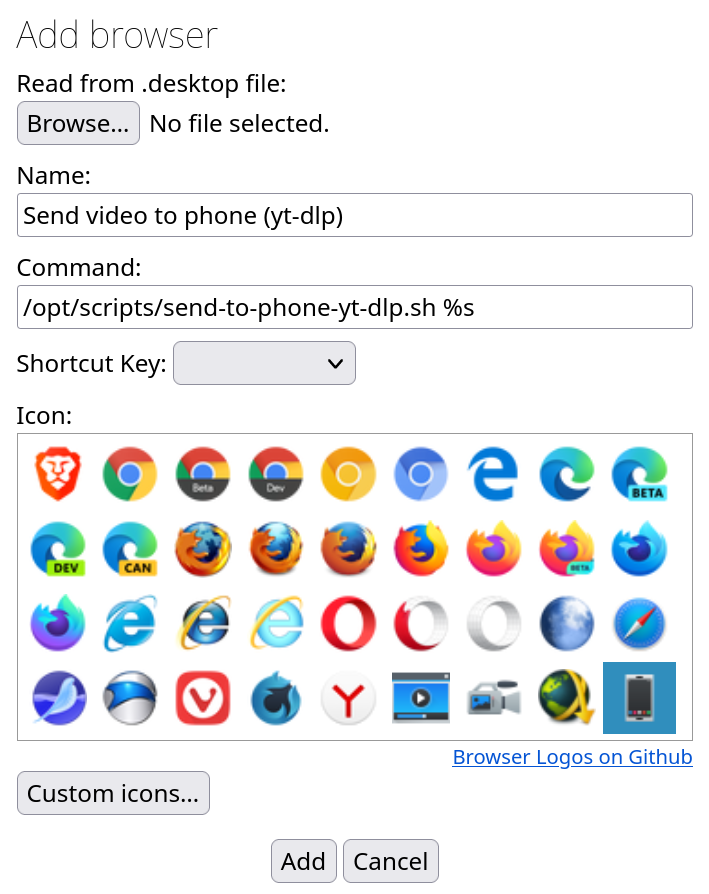
The next step is adding these scripts inside the Open With addon for Firefox. Click the Open With button in the toolbar, and click "Open With options". Click "Add browser". Fill in a name, and the path to the script with "%s" at the end, this is replaced with the URL when the script is invoked. Pick a custom icon if you'd like.

Repeat the same process for the other script, and you should end up with these two entries:

And that's really all there is to it. Now, whenever you are on a page that has a video you want to download and send to your phone, you can click the Open With toolbar icon, then "Send video to phone". If you're viewing a file, click the corresponding Open With item. This also works for links; If there's a link to an image or a file you want to download and send to your phone, just right click the link, go to "Open With", and click "Send file to phone (wget)", or pick the corresponding option if the link is to a video page.

Closing thoughts

Being able to send any video, picture or arbitrary file to my phone in two clicks is really convenient! The Open With addon is also really great for automating many other tasks that involve URLs, here are a couple of examples:

  • If a page doesn't behave/work in Firefox, I wanna open it in another browser. I have the Flatpak version of Ungoogled Chromium installed for that, but opening that, manually copying the URL from FF, tabbing over to Chromium, then pasting it in the address bar is a chore. Just add it to Open With: flatpak run com.github.Eloston.UngoogledChromium %s, and two clicks will open your current URL in the other browser (Note that this will NOT work if Firefox is running as a Flatpak, as flatpak run executed from within another flatpak will silently fail, in my experience, even with full permissions).
  • If I wanna send a link to JDownloader instead of opening it in Firefox, I can just add JDownloader to Open With, with the command /bin/sh /opt/jd2/JDownloader2 %s

I'm sure there are many other uses for this approach as well, get creative!